Sunday, May 1, 2011

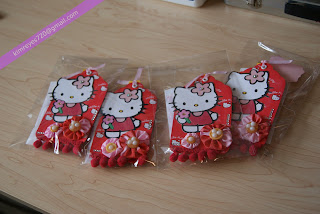
Hello Kitty Tag Swap

Packed and shipped! I'm very excited because this was my first tag swap (or swap of any sort!). What better swap to join than a Hello Kitty themed swap right? I loved Hello Kitty and all her Sanrio friends growing up. When I was younger going to the mall was always a treat because I knew that's where the Sanrio store was. My mom allowed my sisters and I to buy at least one thing every time we visited the store weather it be a stationary set, a pencil box or even a piece of candy. I was obsessed, I even designated a whole shelf in my room displaying all my Sanrio items like a Shrine. (Ahhh....memories) I've only held onto a couple of items but had I known Hello Kitty would make a big come back the way she did, I probably wouldn't have gotten rid of anything!

The swap was hosted by the lovely and very sweet Alee'. You can find her on Youtube or her blog. The rules were simple: It had to be at least 5 inches or more in length, we must use fabric in any way or form (I chose to make a fabric flower) and chose any color theme of our choice. I had a lot of fun creating my tag and am pleased with how they turned out. I can't wait to see the tags from my group members. Once they come in the mail, I'll definitely post them.  

Materials Used:
  • Hello Kitty cartridge
  • George and Basic shapes cartridge (for the tag) 
  • Sanrio paper line by Sandylion
  • Bling
  • Fabric, neddle and thread  
  • Red pom pom trim (walmart)
  • Flat back pearls (Recollections)
  • Buttons  
  • Glossy accents 

Sunday, April 24, 2011

Happy Easter!!!

You are looking at my first ever Easter card and I'm excited to share it with you!  When it comes to card making, I never really venture out to making holiday cards other than for Christmas. I usually stick to the typical birthday and congratulations weather it be wedding or baby type cards. This year one of my New Years resolutions, along side to use my Cricut more, is to make at least one card for all the holidays. So far so good,  I could check off Valentine's Day and now Easter =) . I think the best part of this card is the dollar stamps I used from Michael's. Who doesn't love a bargain?!  

Materials used:
  • Michael's dollar stamp (Chick and sentiment)
  • Versa mark ink and black and clear embossing powder
  • Regal rose card stock as base (Stampin' up)
  • Prima flowers sprayed with LSG "Creme Brulee Cream" starburst spray with a Flat back pearl middle
  • Decorating chalks (to color the lil Chicky)
  • Gelly Roll pen in stardust clear (over top the sentiment)
  • EK success scalloped circle punch
  • Old Olive ink (Stampin' Up) 
  • Yellow satin ribbon 
  • Foam squares (to raise the stamped images) 
Thanks for stopping by!!!

Thursday, April 21, 2011

More Awards =)


 The Rules for the Stylish Blogger award are:
  1. Thank the person who gave this award to me and link back to their blog
  2.  Share 8 things about myself
  3.  Pass this award to 8 other individuals that I have recently discovered
  4.  Leave a comment so that they can pass along the recognition
Thank You Victoria for thinking of me and giving me the Stylish Blogger Award !!!

8 Things about myself:
  1.  I'm a Twilight saga fan...Team Jacob!!! (I have a life size cut out of Jacob in my Scrapbook room and a Jacob blanket in my living room)   
  2. I don't scare easily so I enjoy watching Horror films
  3. I think grocery shopping with coupons is fun (Have you seen that show "Extreme Couponing" on TLC?! lol!)
  4. I love grape and peach flavored anything! 
  5. Every time my indoor dog goes outside to potty I wash her paws when she comes back in. You might think I'm a crazy dog lady for doing this but, it's necessary because my dog has a pollen allergy. Poor thing =(
  6. I can never keep plants alive.
  7. My DVD collection is in alphabetical order.
  8. I have a close relationship with my two older sisters...they are VERY supportive & I love them to death and don't know what I'd do without them.   
My 8 picks are:
  1. Arlene @ http://waterdots.blogspot.com/  
  2. Kiki @ http://www.kendrascreation.blogspot.com/
  3. Dee @ http://cardwithd.blogspot.com/
  4. Tawny @ http://tawnysdesigns.blogspot.com/ 
  5. KaiteO @ http://katieoscreations.blogspot.com/
  6. Susi @ http://artcsushi.blogspot.com/
  7. Mama Hen @ http://scrappingmamahen.blogspot.com/
  8. Lori @ http://craftinblind.blogspot.com/


A big Thank you and hugs to Karen, Joann, and Lisa for giving me the Leibster Award !!!

 The Liebster Award is designed to bring new blogs to light. It is a great way to share blogs that might not otherwise be seen or ones you may want to share with others.

 As a recipient you must share the love and pay it forward by:
-Creating a post where you blog about the Liebster award & reveal your 3-5 blog picks
-Let them know you chose them
-Copy & paste the blog award on your blog
-Have faith that your followers will rally & show their crafty love back out to those you awarded

Here are my picks and who I think are worthy of this award. Please stop by and show them some love! 
  1. June Houck at http://simplyelegantpapercrafts.blogspot.com/
  2. Dorcus at http://www.craftycardangel.com/
  3. Joanna at http://peacelovestamp.blogspot.com/

I'm so honored to have received two more awards from my fellow bloggers again, thank you ladies I greatly appreciate it =) Also, Congratulations to those who I awarded, you guys deserve it! Happy Blogging!!!

xoxo,
Kim

Thursday, April 14, 2011

Ribbon Storage

Since my ribbon drawer was over flowing and starting to take over other areas in my scrap room, I was on a search to find the perfect ribbon storage/organization system. I was looking for something that would be functional, inexpensive, and neat.  I looked through countless blogs, youtube videos and storage websites. Although I found some great ideas I felt some of them were too expensive or just too much work, like re-spooling the ribbon onto a piece of thick card stock or chipboard and filing them neatly away in a drawer. I loved the look of the ribbon shelf, where it's held up with dowels but, It wasn't ideal with the way that I craft (I like to have the spool of ribbon at my side) I'd have to take down the dowel every time I'd want to use a ribbon.  After a random trip to Walmart, I found this container that I thought would be great to house all my ribbon. It works perfectly!! It's by "homz" and is a 3 in 1 organizer with stackable interlocking trays.

Kept the label inside for those of you who are interested

Side View

unstacked
It's was everything I was looking for FUCTIONAL : It has three compartments. Is clear so that I can easily see what's inside. I can fit several rows of ribbon and each compartment is tall enough to put the spools upright so when the trays are unstacked I can see every design/color of ribbon. INEXPENSIVE: It was only $9.97!!!  Just a small price to pay for something that will make life easier not to mention way cheaper than other ribbon box storage systems (that weren't nearly as big) I came across. NEAT: It looks neat and tidy. It stacks to save space and I can slide it underneath my work table. Since it's enclosed my ribbon will be free from dust.

I hope this is helpful to some of you. Please share some of your ribbon storage ideas....what works best for you?    

Tuesday, April 5, 2011

Wedding Shadow Box

My sister Karen (the one I spoke of in my "about me") made this beautiful shadow box layout as a gift to my husband and I shortly after we got married.  She used our favorite wedding picture and I absolutely LOVE it! (Thanks Ate!!!) It's displayed in our bedroom but currently it's not in a shadow box , thanks to my husband who accidentally knocked it over and cracked it. (He didn't even tell me! I noticed it a few days later *shaking head from side to side* boys! Haha....) I'll be replacing it soon but thought this would be a good opportunity to take a picture of it without the glare of the glass.  By clicking on the picture you can get a better view of the detail from her handmade embellishments.  Isn't she awesome?! I just love and adore her work she inspires me always.  On her blog there's a post of a shadow box she put together for our other sister Kathy , using some of  her wedding photos and It's just as beautiful.  You can see how talented she is for yourself , you can find her at  http://reflectionsofapaperaddict.blogspot.com/.

Friday, April 1, 2011

On a Pedestal

I can't take full credit for the design of this card because I got the idea from last years Stampin' Up Catalog (Great idea book!) but I did tweak it a little here and there. This is one of those cards that will be hard for me to give up because I just LOVE the way it came out. Am I the only one weird like that?! LOL! That's one of the reasons why I decided to start a blog, so that I can record my work therefore, making it easier to part with my creations. I like the idea of being able to look back and see what materials I've used so If ever I want to recreate it, I can! It's my own personal online portfolio =).

Materials Used*:
  • "On a pedestal" stamp set
  • "Dot, dot, dot" background stamp 
  • Crushed curry card stock
  • Crushed Curry and Basic Brown ink 
  • Brown card stock (scraps from my stash)
  • Friskars scallop punch 
  • 5/8" cream colored satin ribbon (Dollar Tree)
  • American Crafts button
  • Sakura glitter Gelly Roll pen (used to write over stamped text)
  • Foam squares (to add dimension to the text and cherry)  
*All material used are by Stampin' Up unless noted otherwise.

Monday, March 28, 2011

An award...for me?

I feel so honored to have been given "The Versatile Blogger" award by Kaity-Bug Crafts, Ruby and Lolis. How exciting =) Thank you so much ladies!!! There are rules after recieving this reward and they are:
  1. Thank the person who sent it to you
  2. Tell Us 7 things about yourself
  3. Send/Reward this to 15 bloggers 
7 Things about myself:
  1. I am an organizational freak! I LOVE to organize.
  2. I am addicted to the game "Bejeweled" on my iphone.
  3. I work in the medical field.
  4. I often sing to my dog (don't judge me! Haha...)
  5. I played basketball in high school.  
  6. Purple is my favorite color (Hence, my blog background)
  7. My guilty pleasure is watching craft and makeup haul videos on youtube. (I'm a little embarrassed to admit that! lol!) 
15 Bloggers who I think deserves this reward are:
  1. Karen Wood 
  2. Dorcas
  3. Ashley
  4. Chignon
  5. Crafty Kate
  6. Karen McPherson
  7. Friday
  8. Tami B
  9. Joann
  10. Noahsarkgirl
  11. Lisa
  12. Kimberly
  13. Ms. Nette 
  14. Craftin’ Blind 
  15. Elaine 

Thursday, March 24, 2011

Less is More

The saying, "Less is more" definitely applies to these cards that I made using a simple cupcake embellishment by Martha Stewart. There are days when I feel like making cards but I don't want to bring out "the works", you know the embossing powders, heat gun, stamp sets, ribbons, buttons and more. I'm sure we've all had our lazy craft days, this is the result of mine. These cupcake embellishments are adorable (Martha Stewart you are awesome!!Hehe), they are made out of felt and have a 3 dimensional effect (not sure if the camera picks that up) You can find these at Michael's and it comes in a pack or 8 or 10.

Materials used:
  • me & my BIG ideas "just write" cards in pastels
  • Sakura white Gelly Roll pen 
  • "Happy Everything" stamp set (Stampin' Up)
  • "On your birthday" stamp set by (Stampin' Up)
  • Scraps from my stash
  • Scallop square punch (EK success)

Wednesday, March 23, 2011

"Safari Kids" Mini Chipboard album


I made this for my best friends nephew, AJ (name on the cover). All she has to do is fill it with pictures and journal and it'll be complete. I Can't wait to see how she finishes it up. She too is a paper crafter, "Birds of a feather flock together!" Lol!
Not only was this my first attempt at making a mini chipboard album but this was also the first craft video up on my youtube channel. I never intended to make videos I just used it to watch, subscribe and mark my favorites. It was easier to make a short two minute clip of the mini instead of taking a whole bunch of pictures. Hope you like it!
 Materials Used:
  • Chipboard pieces = coasters found at Michael's dollar section 
  • DCWV Safari Kids paper stack 
  • American Crafts rub-ons
  • Various buttons and ribbons from my stash
  • Glossy Accents
  • Stampin' Up's round label punch

Wednesday, March 9, 2011

Birthday Candles


The beauty of making cards is that you can use your left over paper after doing a layout or mini album. This card was produced using nothing but scraps so I couldn't tell you what paper I used. I'm positive I purchased this clear stamp set at Joann's Fabrics. I'm not  for certain but, I think it's by Inkadinkado (I tossed the packaging when I organized my clear stamps to a binder). A few things I want to point out that my camera didn't pick up are that the candles are raised using foam squares and I stamped and embossed photo corner details. Now that I look at it I could have colored the candles, but what's done is done. I'm pleased with it, This card was fast and simple, hope you like it!  

Thursday, February 10, 2011

Valentine Defined-Birthday

This card was created using Stampin' Up's "Valentine Defined" stamp set. I was hoping to make an actual Valentine's Day card with it but, ended up making a birthday card instead. I can never have enough Birthday cards in my stash, they're the first to go! This has a little bit of a mature look than my other cards but I like how it turned out. The black image you see is embossed with black powder but the camera didn't pick that up. The Happy Birthday sentiment on the card is a rub on found in my stash that actually said "Happy Birthday to you!". The "to you!" part is inside of the card. I thought It was a good way to utilize it, I don't like things to go to waste.

Materials Used*:
  • Sahara sand card stock
  • Whisper white card stock
  • Versa Mark Ink
  • Valentine Defined stamp set
  • Scallop trim border punch
  • Black embossing powder (Martha Stewart)
  • Green stitched Ribbon (s.e.i)
  • Bling (Me & My Big Ideas)
  • Small acrylic flowers (Queen Co.)
  • Happy Birthday rub on (own stash)
*All material are Stampin' Up products unless noted otherwise

Friday, February 4, 2011

Create a Cupcake

"It's not about how many candles you blow out but how many cupcakes you get!"

I made this card for a very good friend of mine who will be celebrating a birthday this month, Happy Birthday Jenn!!! (It won't spoil the surprise because she doesn't know about my blog. Hehe) These cupcakes are adorable, Stampin' Up came out with the cutest products in their latest 2011 Occasions Mini Catalog. My order arrived in the mail the other day and this is the first project I created. I can't wait to see what else I can create with my new stamp set. The paper behind the cupcakes is stamped then embossed with clear powder but I don't think the picture picks that up.

Materials Used*:
  • Sahara sand card stock
  • Create a Cupcake stamp set
  • Build a Cupcake XL punch
  • Wood grain background stamp
  • Dot, dot, dot stamp
  • Versamark ink
  • Dusty Durango
  • Color box liquid chalk ink in Creamy Brown (Local SB store)
  • Clear embossing powder
  • Scrap paper from my own stash
  • White Souffle pen (Asian market)
  • 5/8" Red satin ribbon (Dollar Tree)
*All material are Stampin' Up products unless noted otherwise

Monday, January 31, 2011

Hello Kitty Layout


I just finished this layout of my niece's 4th Hello Kitty themed birthday party from April of last year (trying to get caught up scrap booking my pictures!). Her party had Hello Kitty everything; cake, decorations, cookies and my sister even made bow head bands for the little girls to wear. Ali's headband was blinged out to match her top so I incorporated lots of bling on this layout. I love the way the title came out. I thought it tied in with the pictures really well.
Materials Used:
  • Sanrio paper line by Sandylion
  • Hello Kitty Cricut Cartridge
  • Cuttin' Up Cricut Cartridge
  • Bling from Michaels dollar section

Saturday, January 29, 2011

Valentine's Day Card

I've started to create my Valentine's Day cards for this year and this is the first of the bunch. I recently purchased the two step owl extra large punch from Stampin' Up. Although putting them together was a bit time consuming, the hard work paid off. I love the way these owls turned out.

Materials Used*:
  • French Filgree background stamp
  • Basic Brown ink
  • Whisper white card stock
  • Sahara sand card stock
  • Two step owl extra large punch
  • scrap patterned paper (for owl vest & hearts)
  • Red gingham ribbon (Michaels)
  • Thin red satin ribbon (Michaels)
*All stampin' Up products unless noted otherwise

Sunday, January 9, 2011

Cricut Cartridge Madness!!!


I was so shocked to see that Micahel's was selling Cricut Cartridges for only $9.99!! That's insane. I've never see them this low I kinda felt bad buying them, it's as if I was stealing! Haha... I definitely took advantage of the sale and picked up almost everything I wanted (The hubby had to be the voice of reason) that they had available. One of my New Year's resolutions was to use my Cricut more and this will definitely help achieve that goal.